Japanese Konro Pizza
- James Lafferty
- Apr 9, 2025
- 4 min read

Updated: Jul 11, 2025
Difficulty: The Konami Code / Requested by: me and anyone in Japan who thinks that they can't make pizza in their tiny kitchen /
Time Donation: Total 30 min, 5 min prep, 20 min process, 5 min cleanup
Yield: (1) delicious 20cm (8ish inch) pizza
Choose Your Own Adventure...

ESSENTIAL GEAR:

Japanese Konro (fish broiler)
Japanese gas stove
well seasoned 10.25 inch cast iron skillet
large stainless steel spatula
two baking sheets
pizza cutter
cooling rack
infared temperature gun (optional)
toothpick (not pictured)
SUFFICIENT GEAR
any old broiler
any stovetop
10.25 inch non-stick skillet (it might work)
large spatula
two baking sheets
pizza cutter
cooling rack
any pointy object to poke holes with
MISE EN PLACE

INGREDIENTS
(1) 110g doughball (Click Here for The OCDC Recipe)
pizza sauce
4-6 leaves of fresh basil
50g fresh mozzarella
flour for dusting
PROCESS
STEP 1
Generously flour a baking sheet.
Preheat the cast iron skillet on medium-low heat and the konro on medium heat.
Place the dough ball on the flour.
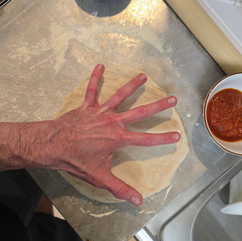
Using the side of your hand, press the dough ball from the center, rolling outward, to flatten the middle, rotating it, and pressing it, until a crust has formed and the dough ball resembles a small, uncooked pizza crust with no toppings.
Pick up the dough ball, and stretch it with your thumbs and pointer fingers, further forming the edge of the crust. When the dough is about 20cm (8 inches), stop stretching. If the dough tears, just pinch it closed. It will be okay, but try not to tear it. Be gentle, it's your little dough baby.
Place the dough back down on the floured baking sheet.
If you have an infrared thermometer, check the pan to ensure that the temp in the center is between 200 and 230 C (400 and 450F).
If you don't have one, preheating it for 5 minutes should be sufficient. Just make sure that it's hot, but the oil from the seasoning is not smoking.
Gently lay the pizza crust in the skillet like you're perfectly placing a blanket on a bed in reverse, starting with the edge closest to you. If you mess it up, you have about 5 seconds to adjust it, so adjust it quickly, so that there are no wrinkles.
10. Immediately take the toothpick and poke holes in the dough, near the inside edge of the crust, and work your way in a spiral motion, to the center of the pizza. This will ensure that the center of the crust does not rise as much.
Bake the dough for 2 minutes, then use the spatula to flip it.
Bake it for 2 more minutes.
It should be slightly browned and spotted on both sides. If it's not, keep baking it, and flipping it until it's done.
At this point, turn off the konro and burner.
Let the dough cool on the other baking sheet and get the toppings prepared.
Alternatively, you can refrigerate the par-baked crust for up to 5 days and start step 2 at your leisure.
STEP 2:
Preheat the cast iron skillet on medium-low heat and the konro on medium heat.
Assemble the pizza, minimal sauce, basil, then top the basil with the fresh cheese. You want to use minimal sauce and cheese due to the high moisture content of fresh mozzarella. If you use too much of either, you'll make a soup pizza. Placing the basil in between the sauce and cheese will prevent burning the basil.
Place the assembled pizza in the back portion of the konro tray and close it.
Bake for 2 minutes, rotate, and bake for 2 more minutes. If the top of the pizza doesn't look done, keep baking and rotating it.
Remove the pizza from the konro with the spatula and place it in the skillet.
Turn off the konro.
Bake the bottom of the pizza for between 2 and 4 minutes, until the desired crisp has been achieved.
Use the spatula to remove the pizza and place it on the cooling rack. This will ensure a crispy bottom.
Let the pizza cool for 5 minutes.
Place it on a backing sheet and slice it using the pizza cutter.
Share and enjoy!
*VARIETY NOTE: You can literally put anything on a pizza, so be creative! Here are some ideas, cheese, pepperoni, and sausage. Go crazy! (but not too crazy)


STORYTIME
While living in Japan I found that I couldn't make pizza in my tiny kitchen due to not having an oven. We had a microwave / IH burner oven, but it would completely burn the top of pizza and not cook the bottom. Trust, I tried all kinds of wacky methods to solve the problem, but to no avail. I came up with the idea to par-bake pizza crusts and use a skillet / konro combo to perfectly bake them. The idea came to me in a movement of high clarity while making a pan-baked naan recipe at my daughter's house; Wal-Mart was out of naan bread, so I decided to make my own. While making the naan, I remembered that Prager Bros. bakery in Carlsbad, California used to par-bake their crusts. At the same time, I also realized that I could make par-baked crusts. Then I could use them like Mama Mary's premade crusts to make pizzas, just like in 6th grade. However, in my tiny kitchen, I still didn't have an oven. I instinctively knew that I could cook the top and bottom of the pizza separately. Boom! Now I make 8 par-baked crusts at a time and we all have our personal pan pizzas. BOOK IT!
SHOUTOUT
A special thanks goes out to Wal-Mart for not having naan that one time; not to Prager Brothers though, cause the manager banned me from our pizza relationship. That's another story.
Playlist:
Somebody already made a pizza making playlist and it gets The OCD seal of approval.


Comments